Stratux Case for RY836AI

Stratux Case

Stratux is a project to provide ADS-B data to ‘electronic flight bag’ apps. It can receive “next gen” transponder information, as well as weather and advisories from ground stations. A GPS module provides location, and gyros, accelerometers, magnetometers, and pressure transducers can even provide limited attitude and heading reference (AHRS)

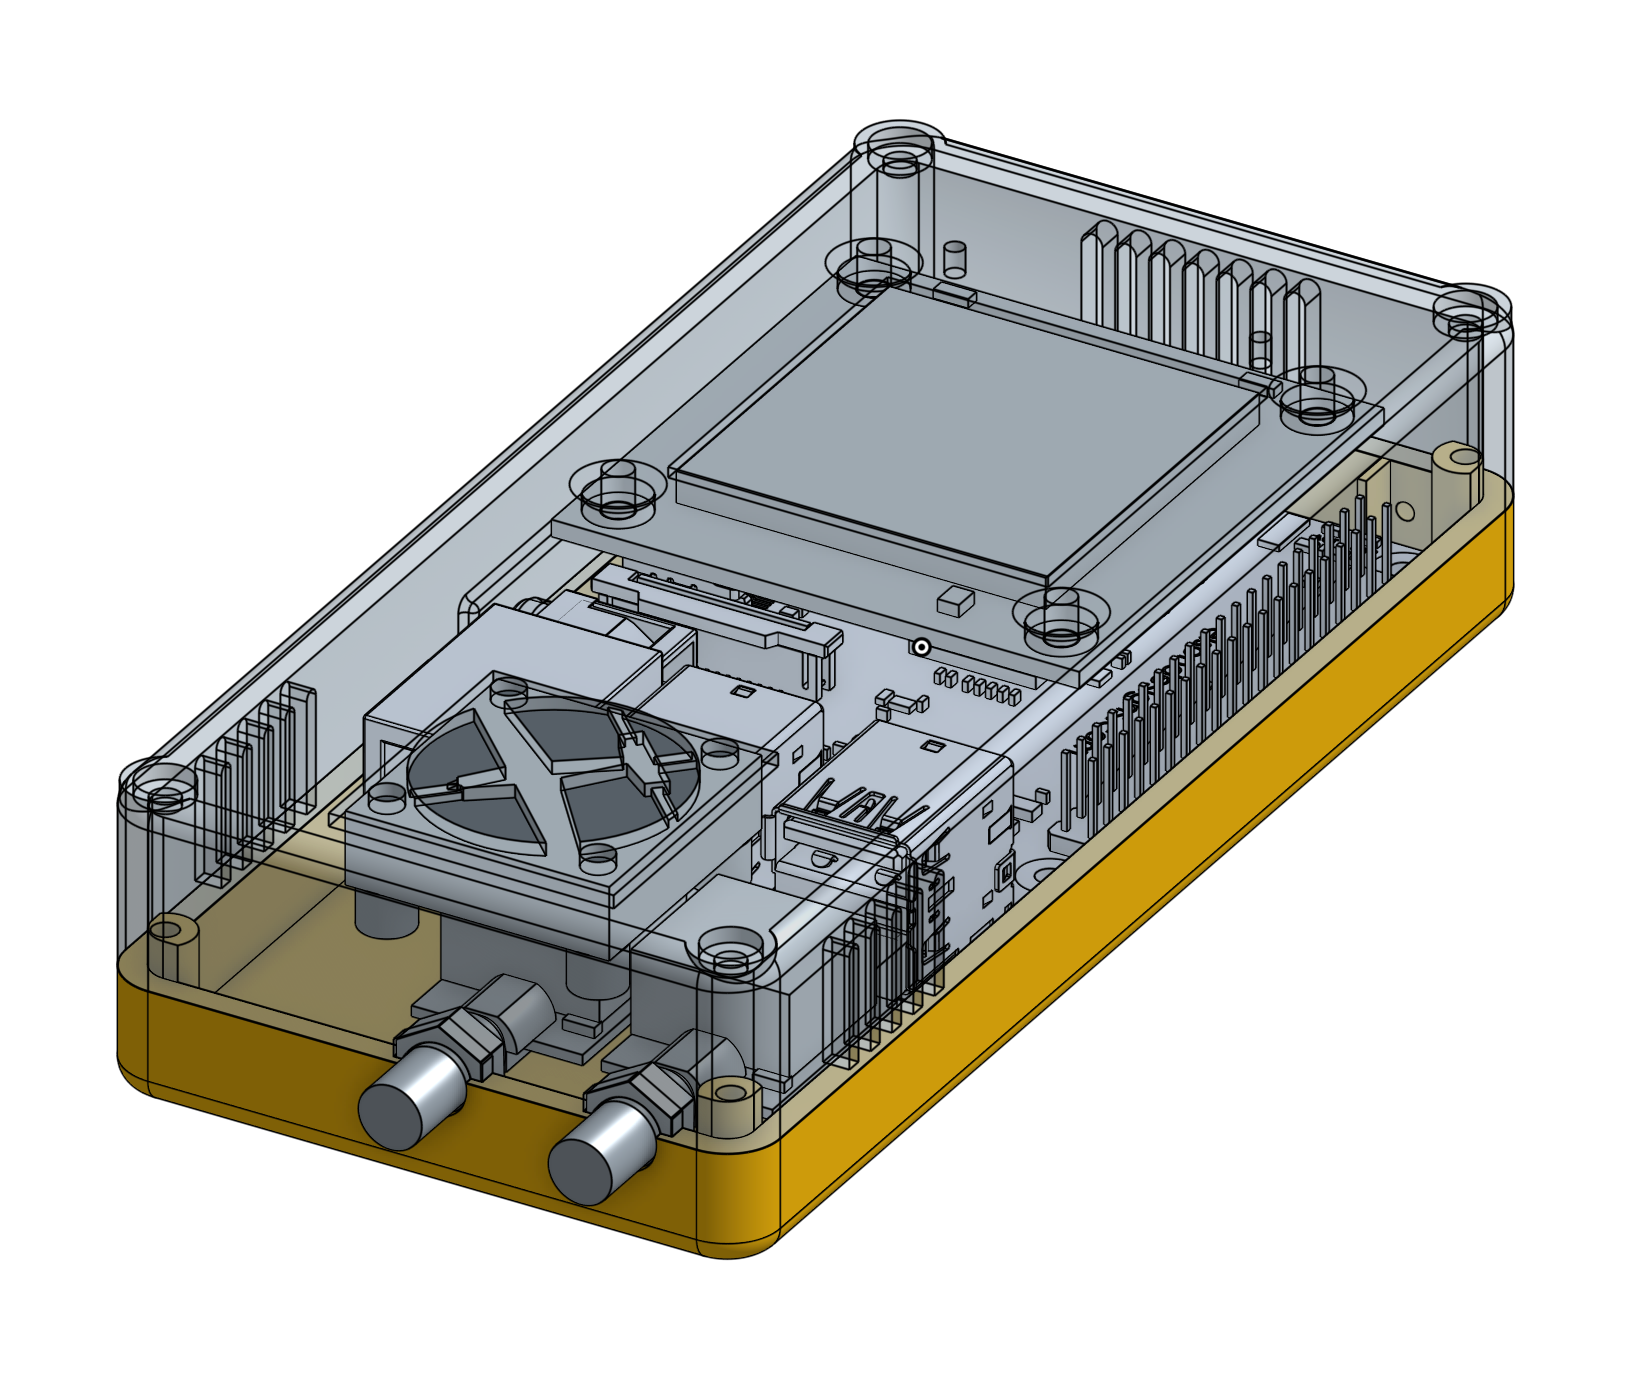
I took some time to design a nice case that holds all the components. I designed a “HAT” for the Raspberry Pi that holds the GPS module and provides fan control. (Originally this Pi Hat had GPIO 4 controlling the fan. I’ve updated the design to use GPIO18, which is used by other Stratux fan controllers and by the software. I have not made or tested this revision.)

You can find the STL files on Thingiverse. This design is meant to be used without the hat, and the GPS module is mounted to the top case directly.
You can find the design files for the hat on GitHub.

3D Printed Port Cover

Since the MP2x00 did not come with an internal modem (and one was never sold), each MessagePad came installed with a little plastic cover that fills the space where the RJ-11 jack would be.

This is the same cover where apple would place a “2100” sticker indicating that a MP2000 was upgraded to a 2100.
Due to an oversight, the WiFi card extended into the area where this plastic cover would sit.  (I’m not sure this could have been avoided, even if I had planned ahead)

Instead, I’ve designed a replacement cover that does not interfere.  For good measure, I added an embossed WiFi logo to indicate that the internal WiFi card is present.

I think it makes for a nice finished product.

The STL files for the port cover can be found here: https://github.com/jake-b/Newton-Internal-WiFi/tree/master/Port%20Cover

Alternate UART for Sailfish

UART0, otherwise known as the Mightyboard’s primary serial port, is connected to the USB hardware and used for communicating with Replicator G. Both RevE and RevG Mightyboards have an unpopulated header that contains for the 2nd serial port, UART1. Normally unused on modern hardware, this second serial port was originally used for the RS485 chain for slave tools.

I wanted to use this UART1 for something useful, so I added some code to Sailfish that allows you to swap the primary UART0 traffic to UART1. This allows you to connect a serial device to UART1, such as a bluetooth serial module, or a network-to-TTL-serial adapter. Bluetooth serial modules should work pretty easily, but with a little coaxing, you can even get ReplicatorG to connect over the network.
Continue reading “Alternate UART for Sailfish”

Experimental Replacement for FlashAir Web User Interface

This is an experimental replacement for the FlashAir user interface. I use on my v2 card. I’m not if it’ll work with a v1 card, but it should.
This replacement UI for the FlashAir gives you a few more features on the web interface:

  1. Delete files from file list
  2. File upload progress
  3. Verify file size of upload to insure that it matches what’s on the FlashAir. (not a full diff like I do with the python script, due to javascript limitations)
  4. Drag and drop on browser window to upload.

Continue reading “Experimental Replacement for FlashAir Web User Interface”

$32 Network Print Server for Makerbot

Information on taking a LPC1768 and turning into a print server for the Makerbot. Use a Toshiba FlashAir to load your X3G file to the SD card, then use this to send the build command and start the print. The Mini-DK2 development board is $32 on eBay, or for $8 more you can have one with an LCD display. An mbed LPC1768 module from mbed.org works as well, but you’ll need a carrier board that has ethernet and a USB host port. This is built with the mbed.org toolchain, so you need to own at least one mbed module (LPC1768 of course) in order to access their online compiler and toolchain.
Continue reading “$32 Network Print Server for Makerbot”

Toshiba FlashAir WiFi-Enabled SD Card

SDCards.png

On the Makerbot Operator’s Group there was a discussion on network control of the Makerbot. A few options were discussed, including the EyeFi and the Toshiba FlashAir.

I decided to buy a FlashAir and see if I could get it to work. The ability to both download from and upload to the card is listed as a feature, and mentioned in many reviews. Unfortunately, there is no mention of the upload feature in the documentation or in the card’s UI.

Out of the box, the card broadcasts as a WiFi base station. When you connect to the card’s SSID, you then get a web server that allows you to read the files on the card. That’s about it. Settings are configured by a text file stored in a directory on the SD card.

Luckily, it seems like there is a trove of undocumented features on the card, including upload ability, and the ability to join an existing network. I posted to the Google Group with some information on how to use this card in a Makerbot. I’ve found a lot of information, so rather than multiple posts to the Google Group, I figured I’d post the info here.

Continue reading “Toshiba FlashAir WiFi-Enabled SD Card”