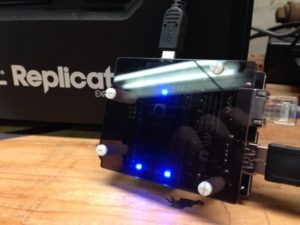
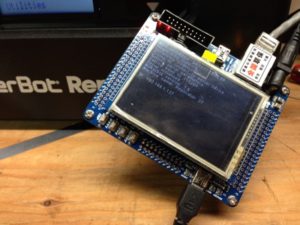
Information on taking a LPC1768 and turning into a print server for the Makerbot. Use a Toshiba FlashAir to load your X3G file to the SD card, then use this to send the build command and start the print. The Mini-DK2 development board is $32 on eBay, or for $8 more you can have one with an LCD display. An mbed LPC1768 module from mbed.org works as well, but you’ll need a carrier board that has ethernet and a USB host port. This is built with the mbed.org toolchain, so you need to own at least one mbed module (LPC1768 of course) in order to access their online compiler and toolchain.
WARNING
READ ALL OF THIS BEFORE PROCEEDING
This is not a commercial product or a hardened and secure network appliance. It is intended as a thought experiment or proof of concept and should not be relied upon in any way. Always operate your 3D printer in a safe and controlled manner.
- This is pre-alpha quality software, and not commercial quality hardware and software. It controls a 3D printers with heaters, motors, and other expensive hardware. It can cause bad things to happen to and with these, heaters, motors, electronics, etc.
- This is not a hardened and secure network appliance. Do not connect this directly to the exposed internet. It is intended to be behind a secure firewall (and NAT) such that it will only accept commands from the local network. Imagine how much fun a hacker could have instructing your 3D printer to continually print Stanford bunnies. Well it could be much worse then that– commands can crash your machine (both in the software sense, as well as in the “smash your moving parts against the side of the machine repeatedly sense), overheat your extruders, cause your build plate to catch fire, and do damage to surrounding people/property/buildings/etc. You have been warned.
- Never Print Unattended be ready to stop the machine if something goes wrong. Keep in mind, these heaters are operating at high temperatures, and if something catches on fire, it could cause damage to the machine, other property, and/or hurt yourself or others.
- You should understand what you are doing. The information here is not intended as a set of step by step instructions. You should engineer your own solution, which may wind up being better than mine.
- Proceed at your own risk. You’ve been warned. If you break your bot, burn your house down, or injure yourself or others, I take no responsibility.
This information is provided by the author “as is” and any express or implied warranties, including, but not limited to, the implied warranties of merchantability and fitness for a particular purpose are disclaimed. In no event shall the author be liable for any direct, indirect, incidental, special, exemplary, or consequential damages (including, but not limited to, procurement of substitute goods or services; loss of use, data, or profits; or business interruption) however caused and on any theory of liability, whether in contract, strict liability, or tort (including negligence or otherwise) arising in any way out of the use of this software, even if advised of the possibility of such damage.
Introduction
I’ve been working on a side project to solve the “last mile” problem for people wanting to print from the network on their bots. I feel like the first half of the problem is solved with the FlashAir– getting the files to the card. The next step is a lightweight way of sending the “play back capture” command to the bot.
I looked around for a microcontroller platform that supports both networking and can function as a USB host. I happened to have an mbed (mbed) on hand that fit the bill. The mbed also has a working online toolchain (you need to own an mbed to gain access to the compiler). Some people don’t like the online development environment, but I’m a fan of “working” and “Mac compatible.” It was a good start, but cost wise, you would need an mbed LPC1768 module and some sort of carrier board that has both USB host and ethernet, or rig up your own connector solution. I happened to also have a Seedstudio mbed shield carrier board. This provides ethernet and USB connectors, but is another $25, putting the solution at around $75.
I also had an LPC1768 development board here called the “Mini-DK2”. It has a USB host and a wired ethernet connector on board (search ebay if you’re interested). It’s a single-board solution that costs only $32 (and for $40 you can get one with a touchscreen) Its the cheapest development board I’ve seen with both USB host and an ethernet connector. I considered RasPi, but I’m not on that bandwagon. Since I had the Mini-DK2 on hand from another project that never went anywhere, I moved from the mbed module and carrier board to the DK2.
The mbed environment can compile binaries that work on the DK2 (again, you need to own at least one 1768 mbed already to get a license to use the compiler), and the mbed libraries provide some nice features. A USB Host library and and Ethernet library were readily available. The USBHost library didn’t quite work out of the box. It took some time and more learning about the USB protocols than I would have liked, but I have the board communicating over the USB Host and the Makerbot.
Changes to stock mbed libraries
mbed provides a USHost library that includes a USBHostSerial object for connecting to CDC serial devices. Unfortunately, it did not work for me out of the box. I spent some time learning about USB protocols. One good reference is Jan Axelson’s Lakeview Research discussion about CDC. I found that the stock library was sending the control transfers to Interface 1. From what I understand, the control transfers needed to go to interface 0. I modified the USBHostSerial library to correct this, and the serial port interface came to life.
Next, I found that I wasn’t able to get reliable communication. I traced it to what I think is an odd C++ inheritance and override problem. The USBHostSerial class implements the Stream interface, allowing printf/scanf operations. This is done by overriding the virtual _getc and _putc methods. Unfortunately, and for a reason I can’t understand, these methods were not being called consistently. Sometimes they would work, but other times they would not. My solution was to implement transmit/receive methods with different names, and since the names were different, they seemed to get called consistently. I’d like to learn exactly what’s going on here, but I don’t feel like debugging it for academic purposes when it works just fine with the added methods.
Source code
I intend to release the source code on mbed.org shortly. I’m just waiting for mbed support to fix a problem with my account on that site.
Web server usage
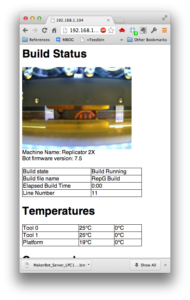
In version 0.2 of the firmware, I added another thread running a very lightweight HTTP server. This, again, is not a security hardened, standards compliant HTTP server. It will fail if you throw something unexpected at it. It pretty much only does the minimum to process and respond to well-formed requests and commands.
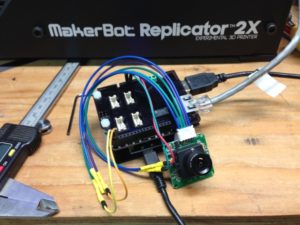
In version 0.3 of the firmware, I added support for an LS-Y201 camera for taking pictures of the build area and sending them as part of the status page.
The camera is powered by 5V but the LPC1768 I/O pins are 5v tolerant. The connection is currently on UART2, but I might change that in the future to UART1. The seeedstudio shield has “Grove” ports and one of which is the UART1 serial port. I ordered some connectors and I might as well use the grove port rather than individual jumpers.
If you want basic (unencrypted) authentication, you can configure it with the A command using the telnet server on port 7654 (see below)
Telnet Usage
Connect up your chosen dev board to power, ethernet and the USB host to the Makerbot’s USB cable. The Mini-DK uses a USB-OTG adapter for the USB host. If you’re using a Mini-DK board with an LCD, it will inform you of it’s IP address on the display. This means it is now listening for a connection on port 7654.
If you are using an mbed dev board, or a Mini-DK without a display, the message will be directed to the serial console. Connect your computer to the appropriate port at a baud rate of 115200 to see the messages.
Use a telnet client to connect to the given IP address at port 7654. Telnet clients typically revert to “line mode” on ports other than 21. This means you get a local echo and the command isn’t sent until you press enter.
Once connected, you can send the following commands:
- A <username>:<password>
- Set authentication information in the form username:password. For example “mybot:pass123” no quotes. This format is required. This sets the password for both telnet sessions and web sessions. This is stored in the microcontroller’s flash. You will need to wipe the flash (by re-programming the device in a manner that wipes the flash) in order to reset the password. Note again that this is not a commercial product or a hardened and secure network appliance. This password is just meant to keep people from accidentally blundering in and messing with the bot.
- V
- Print the version and Makerbot name, as well as the local firmware version (the Makerbot_Server firmware as discussed here).
- B <filename.x3g>
- Build from SD the given filename. According tot he protocol spec, this command is limited to 12 characters, so 8.3 filenames only.
- P
- Pause an active build
- R
- Resume active build
- C
- Cancel build– note that this immediately halts the build and does not clear the build area. You might want to pause the build first, and then cancel shortly after to make sure the nozzle isn’t left hot and in contact with a printed part.
- S
- Print build status, tool and platform temps
- Q
- Quit and logout
The Mini-DK has two onboard buttons (besides the ISP and reset buttons). Currently one button will trigger a pause (if the Makerbot is printing) and the other will resume (if the Makerbot it paused)
Installation
If you are using a mbed, then you can simply load the BIN file to the mbed using the mass storage bootloader. The mbed mounts as if it were a USB thumbdrive, and you copy the BIN file to the drive. After a reset, you’re running the installed firmware.
The MiniDK has a serial bootloader. You connect to this bootloader from the “top” USB connector (not the USB host one). Hold down the ISP button and then tap the reset button and then release the ISP button to put it into programming mode. I use lpc21isp to load the binary. The other option is FlashMagic, which uses HEX files, so you’ll need to use some sort of bin2hex utility to convert the firmware file if you use this utility. I can’t really say if/how this works, as I don’t use this method. See this page on mbed.org for more info.
The source code is now in the repository at mbed.org: http://mbed.org/users/jakeb/code/MakerBotServer/


