On the Makerbot Operator’s Group there was a discussion on network control of the Makerbot. A few options were discussed, including the EyeFi and the Toshiba FlashAir.
I decided to buy a FlashAir and see if I could get it to work. The ability to both download from and upload to the card is listed as a feature, and mentioned in many reviews. Unfortunately, there is no mention of the upload feature in the documentation or in the card’s UI.
Out of the box, the card broadcasts as a WiFi base station. When you connect to the card’s SSID, you then get a web server that allows you to read the files on the card. That’s about it. Settings are configured by a text file stored in a directory on the SD card.
Luckily, it seems like there is a trove of undocumented features on the card, including upload ability, and the ability to join an existing network. I posted to the Google Group with some information on how to use this card in a Makerbot. I’ve found a lot of information, so rather than multiple posts to the Google Group, I figured I’d post the info here.
I didn’t catch what version of the software was installed on the card initially, as I updated it to the version on the Toshiba FlashAir Website first thing. The version is 1.00.03, and the information that follows is for this version.
The first time you connect to the card, the web application allows you to configure a WiFi network address and password. There is also an Windows/Mac app that can configure the card available from the Toshiba website. The configuration is stored in a text file on the SD Card in the “SD_WLAN” Directory (SD_WLAN/CONFIG)
Since Sailfish has SDHC support, this becomes possible. Other firmware (including the Makerbot stock firmware) does not support SDHC currently to my knowledge.
Quick Start How-To#
- Install the latest firmware on your FlashAir card
- Copy the configuration file below.
- Edit the APPSSID and APPNETWORKKEY lines to your WiFi network’s settings. (WPA2 networks are all I’ve tested)
- Optionally, remove the “COMMAND” line which forces the card to not use 802.11n
- Replace the contents of the CONFIG file in the SD_WLAN folder. Unmount the card and eject.
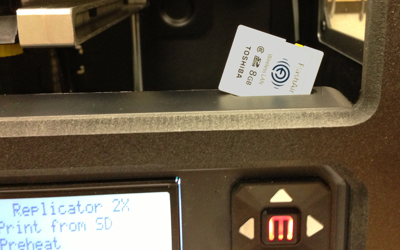
- Put the card into your Makerbot and turn it on. Wait a few minutes for the card to negotiate and connect to your network.
- Find the card’s IP address on your network. I can’t really tell you how to do this. My router has a status page that lists connected devices and their IP address.
- Connect to your SD card in your web browser by navigating to http://
/ - Start uploading files by navigating to http://
/upload.cgi (see below for info on the limitations of file uploading)
Configuration File#
The configuration file is in the old “Windows INI” format:
[Vendor]
CIPATH=/DCIM/100__TSB/FA000001.JPG
VERSION=F24A6W3AW1.00.03
CID=02544d53573038470750031e0c00cc01
PRODUCT=FlashAir
VENDOR=TOSHIBA
UPLOAD=1
APPMODE=5
APPAUTOTIME=3600000
APPNAME=Makerbot
APPSSID=Basement
APPNETWORKKEY=****
LOCK=1
COMMAND=wlan 11n 0
This is my current configuration file. Relevant lines are:
- UPLOAD = 1 enabling the file upload capability
- APPMODE=5 enabling client mode and connecting to my existing network.
- COMMAND=wlan 11n 0 disables 802.11n capability. I am not sure the capabilities of the card or its supported frequencies (2.4/5ghz) but I’m using it against an old b/g router, so I figure, why not just disable it. Also, this was an attempt to force b/g back when my router was further away and I was trying to improve performance.
- APPAUTOTIME=3600000 This line sets the timeout for when the card disables its wifi access point. Normally its set to 5 min or 10 min. I have it set to an hour… but there is some evidence that it is ignored when using the client mode, since I’ve seen it stay on the network for much longer than an hour.
For more information on the CONFIG file, see the “CONFIG File Keys” section below.
CGI Executables#
The web app exposes a few useful executables
- http://[IPofSDCard]/upload.cgi
- The upload interface. UPLOAD=1 configuration option must be enabled in order for this page to work. See the upload section below for more information
- http://[IPofSDCard]/eva.cgi
- Some sort of log file viewer. Shows the log from the last time this page was executed.
Uploading files#
In order to upload files, the CONFIG file must have the “UPLOAD=1” option set. Once enabled, the upload.cgi executable becomes available.
When you navigate to http://[IPofSDCard]/upload.cgi you will receive the following form:
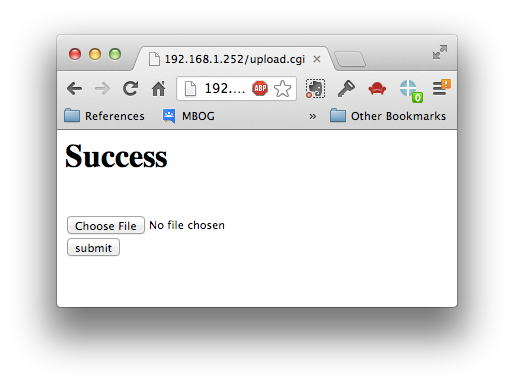
Select your file and click upload. You’ll get back a “Success” indicator and the form if you were successful. You’ll get “NG” back (No Good?) for failures. For example, if you try to upload a long filename (see limitations below)
There are some limitations to the uploading feature:
- The upload feature only supports 8.3 filenames. The card itself supports long filenames, of course, but the upload function (and the entire webapp in general) does not.
- All uploaded filenames uploaded are uppercased. So “NewArm.x3g” becomes “NEWARM.X3G”. Current versions of Makerbot firmware (and Sailfish) will only show lowercase extensions, but Dan has kindly decided to tentatively include a case insensitive filter in the next release of Sailfish. (It takes up some precious bytes, so it may eventually need to be removed someday)
- Finally, the card’s a little slow, but its not terrible for transferring X3Gs. You need to have a good connection. See the “WiFi Connection and Networking” section below for more info.
The upload page also has the ability to do a few other things:
- Delete a file
- http://[IPofSDCard]/upload.cgi?DEL=[pathToFile] will delete a file.
- Change Working Directory:
- http://[IPofSDCard]/upload.cgi?UPDIR=[pathToChange] will change the directory of the next upload. If the directory does not exist, it will be created.
You can use tools like curl to upload files as well:
curl -F [email protected] -F submit=submit http:///upload.cgi”
Just change UPLDFILE.x3g to the file you’d like to upload. Just make sure to keep it an 8.3 filename as per the limitations. THe “@” tells curl that you are uploading a file and not a text form field.
WiFi Connection & Networking#
The card is intended for short range use. If you are using the undocumented client mode, and your router is too far away, you’ll get poor performance. I actually setup a second wifi access point nearby so that the card had a short range to communicate. This improved packet loss and transfer speed. I’m sure the card is affected by factors such as congestion on the various wifi channels, etc. My supplemental router has no other clients connected to it, so the card doesn’t have to deal with a lot of traffic on the network. I don’t know how useful this is.
One note as well, if you’re playing with the card in an SD reader (such as on a MacBook Air, then be wary that the OS might shutdown power to the SD card when there isn’t any disk IO. I have found that the card stays online much more reliably when in the Makebot than when connected from an SD Card reader. Also, the proximity of the laptop’s own WiFi card might affect the reliability of the card when used in this fashion.
When using the client mode, you can setup your DHCP server to assign a static IP and hostname for quick and easy access.
CONFIG File Keys#
- APPSSID
- The SSID that the card broadcasts when operating as a host base station. The SSID of the network to connect to when in client mode.
- APPNETWORKKEY
- The WPA2 password for the network (both host and client modes). The configuration application from Toshiba has a mechanism of setting this in a secret manner, and this field will be set to *******. It is possible that the card will edit the CONFIG file after boot and store the password in a secret manner, and do the replacement to asterisks. I haven’t explored this yet.
- APPNAME
- This is the server name of the card, when in host mode. It does not appear to inform the DHCP server of the name when operating in client mode.
- APPMODE
- The default is 4, for host mode. Undocumented mode 5 will connect the card up as a client.
- APPCHANNEL
- I didn’t try it but I guess it allows you to explicitly set the wifi channel.
- LOCK
- This is set after initial configuration. Removing this key will cause the card to rerun the welcome script.
- UPLOAD
- Undocumented, but set the =1 to enable the upload.cgi script, allowing network uploads to the SD card.
- HTTPDMODE
- Not sure
- HTTPDUSER
- You can set a HTTP username and password for the web app
- HTTPDPASS
- You can set a HTTP username and password for the web app
- APPMINTIME
- Not sure
- APPMAXTIME
- Not sure
- APPAUTOTIME
- in 1/1000 sec. The amount of time the app/wifi stays online after power up.
- DNSMODE
- Not sure
- REDIRECT
- Not sure
- APPEXT
- Not sure
- APPTYPE
- Not sure
- AGINGTIME
- MAC Aging time? Not sure
- WLANSTAMODE
- Not sure
- DOMAINNAME
- Not sure
- VERSION
- Version information
- CIPATH
- Card image path, part of the card’s functionality as a real camera card. Not sure.
- COMMAND
- Execute a command on startup. You can use this multiple times. The card doesn’t have a true command line, but there are enough commands that it is similar to a lightweight command line. See “Commands” below.
- APMODE
- Not sure
- NOGATEWAYMODE
- Not sure, maybe prevents the card from accessing the internet when in client mode?
- SCRIPT
- Not sure. Possibly something to do with a SCRIPT.txt file
Commands#
The COMMAND key in the CONFIG file lets you execute predefined commands. I think this has some power behind it, but for now I’ve only really used it for a few things
Adding “COMMAND=wlan scan” to the CONFIG file for example will do a WiFi scan on startup– you will see the results in the eva.cgi log.
Some commands
- wlan scan
- Do a WiFi Scan. Results in the eva.cgi log.
- wlan 11n <0 or 1>
- Enable or disable 802.11n support. Not sure if the hardware is capable, but the base station I have setup nearby does not support it, so I use “wlan 11n 0” just so that it doesn’t try to negotiate 802.11n
- ftpput [-p
] - Seems like there is a full FTP client. Not sure how useful it is since the COMMAND lines are only executed on startup.
- ftpget [-p
] - Seems like there is a full FTP client. Not sure how useful it is since the COMMAND lines are only executed on startup.
One note, I think there might be a “SLEEP=xxx” command for the CONFIG file that I hypothesize adds a delay to the processing of the CONFIG file. Maybe this could be used to delay for a minute or two to insure the WiFi link has been negotiated before using an FTP command. I have not tried this.
FlashAir Uploader#
Attached is a really simple “use at your own risk”, not much error handling, python script to upload files to the FlashAir.
It uses the “Poster” library which you must install: https://pypi.python.org/pypi/poster/
Usage is simple:
flashair_uploader.py -v -c makerbot.myhomenet.private PRINTME.x3g
the -v will subsequently download the file back off the SD card and verify that it went up properly. The -c parameter is for the IP of the card. It uploads into the root directory of the card.
It uses ANSI code to render the progress bar. Not sure how well it will work on the Windows Command line, but works great MacOS. Maybe someone will improve it using the CURSES library or something? If you make improvements, post them here.
I haven’t done much testing with concurrency and how replacing files works. I think its possible for you to upload a file to the card over the WiFi interface, and verify it and the SD card interface still has an old version cached. More testing is necessary. Let me know if you discover anything. I recommend using a new filename each time just to be safe.