PiZeroWallet
A pseudo-airgapped offline hardware wallet for cryptocurrency
Introduction
For various reasons, I have been experimenting with the Bitcoin and Etherium currencies. While I do not have a vast fortune, I still wanted to generate and store my private keys in a safe and secure manner.
What I really wanted was a Leger Nano S. These at the time, however, are backorered for months. So I started to explore methods for generating and storing keys.
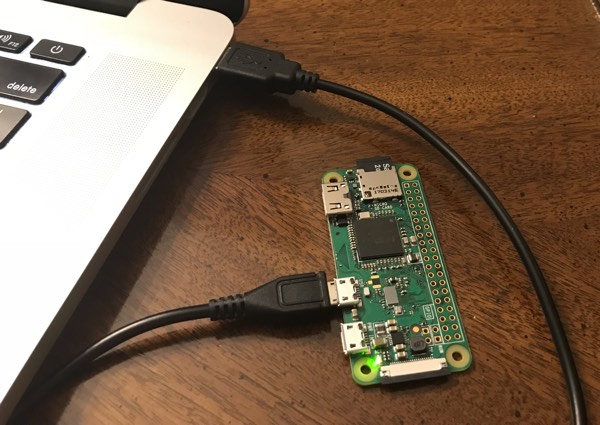
I decided the Raspberry Pi Zero 1.3 was an good platform for this endevor:
Reasons why I selected a Pi Zero 1.3:
- It has no onboard networking hardware, making it easy to maintain separation by simply never connecting a network interface.
- It is small, so when done, you can store the thing in a safe place, such as a safety deposit box.
- The serial gadget makes it possible to connect the Pi Zero to a host machine and login to the command line. This is what I mean by “pseudo-airgapped”. Yes I am connecting the machine to another via USB… but in theory, only via a simple serial connection. I’m sure there are state-level hackers that could do something malicious with this connection, but I’m pretty satisfied that it is somewhat secure for my purposes. (If you are really paranoid, you could use the Pi Zero’s serial port and use a USB-to-TTL-Serial thingy, and completely isolate the Pi from anything but a serial console)
The challenge was to build a Pi with all the necessary software while never connecting the Pi Zero to the internet. What follows are my instructions on how I did this.
Disclaimer
I am doing this to explore the world of cryptocurrency, not as an investment. I currently hold TENS of US dollars in cryptocurrency. This is secure enough for my purpose. I am not an expert, so evaluate the risks before you put any significant investment in cryptocurrency at risk on some random person’s solution to the wallet problem. I am not responsible if your coins are lost or stolen.
What you need
Here is my bill of materials
- Raspberry Pi 1.3 – $5 at microcenter
- An 8GB MicroSD card – can be had for $2 on eBay if you’re willing to gamble
- Optional: The stuff need to connect the Pi Zero to a monitor, keyboard, and mouse. – $14 – while this is optional, I still recommend it.
So for about $21 you have everything you need. Not counting the keyboard, mouse, and monitor.
Advantages/Disadvantages to a true Hardware Wallet.
The Ledger Nano S has some advanages:
- Pro: True “secure element” hardware protects your keys and the private keys never leave the device after creation.
- Pro: Chrome Plug-in makes managing your wallets and performing transactions easy.
- Con: Hard to get currently
- Con: Expensive shipping if purchased from France
- Con: Expensive markup if purchased on eBay
The Pi Zero 1.3 has some advantages:
- Pro: It’s a learning experience
- Pro: It’s cheap
- Pro: It’s available
- Pro: Easy to “Air-gap” by just keeping network hardware away from it
- Con: No Chrome Plug-in. You can you a serial login session to use command-line tools to sign transactions manually.
- Con: It has no “secure element” and if somone gets ahold of your Pi Zero or micro SD card, then unless you have encrypted your wallet, your keys are exposed.
- Con: I’m not sure how long-term reliable the SD card is for storage of keys. This is why I wanted a paper wallet feature to back up my keys.
- Con: Must be properly shut down before removing the power or risk data loss. This is why I consider the paper wallet my true “wallet”
Features I wanted for my Pi Zero wallet
I had a few goals in mind for my Pi Zero Wallet:
- Must never connect to the internet or any network
- Must be able to generate Bitcoin and Etherium addresses fully on device
- Must be able to print a paper wallet or seed phrase directly to a USB-connected printer
- Must be able to sign transactions as part of a hot/cold wallet system
To reach these goals, the following prerequsistes were needed:
- CUPS and all pre-requisites necessary to use a USB-connected printer
- Electrum and all the pre-requsites necessary to run it.
- Geth to generate Etherium adressses and keys.
- An offline copy of MyEtherWallet.com to print the Etherium wallet (could be used to generate keys as well if desired)
How to accomplish this
Normally, installing software like this on a Raspberry Pi is a matter of a few calls to apt-get. The dependencies are resolved and installed, and you’re good to go. This method, however, fails when you’re building a computer that’s completely disconnected from the internet. This is where vendoring comes in:
“Vendoring is the act of making your own copy of the 3rd party packages
your project is using. Those copies are traditionally placed inside
each project and then saved in the project repository.” [1]
Unfortunately, I couldn’t find any tool that performed this function for me when it came to Debian packages (.deb). So I wrote my own little python script that downloads the a list of pacakges. While I could have traversed the dependency tree myself, I opted for an easier approach. I simply installed each package on a development Rasberry Pi that was connected to the internet, and took note of what packages were installed.
After running the list of dependencies, you’re left with all the deb files and a shell script in a tarball. The scripts them up and ship them over to the Pi Zero, where I extract them and run the script to install. More on this later.
The Steps
Here are the steps I took to build my Pi Zero Wallet. Feel free to follow along.
- Download Rasbian and verify the md5 checksum. I use the full version because I like the option of using the GUI interface to Electrum if I want. Also MyEtherWallet requires a browser to use. You can do everything you need with Electrum’s and geth’s command line interface, so if you’re not interested, you can probably do the “Lite” version.
- Write the disk image to your SD card using your method of choice. As a mac user, I use dd to write the image (replace ridskX with the proper device, make sure not to destroy the wrong disk!):
sudo dd bs=1m if=2017-07-05-raspbian-jessie.img of=/dev/rdiskX conv=syncThat
conv=syncis important is left off of some documentation. I found that the full image was not properly written without it [2] - Remove the MicroSD card from your computer and place it into the Pi Zero. Hook up a keyboard, mouse and monotor. We can now start the process of configuring and installing the software.
Some things you might want to do at this point:
- change the pi user’s password
- run the Raspbian configuration tool (in the menu) and configure your Pi Zero to boot to the CLI rather than the GUI (you can always start the gui from the command prompt by running
startx) - Localization, Set Locale, Timezone, Keyboard. (note that you will have to manually set the clock each boot if you desire, since the Pi does not have an RTC that’s backed up by the battery)
- Disable auto login
- The first bit of configuration is to setup the “Serial Gadget” interface. This allows you connect the Pi Zero as a client device to a PC and communicate over serial. With this, you can power and communicate with the Pi using a single USB connection.Follow the instructions from Adafruit on Setting up a Serial Gadget
To summarize:
- edit /boot/config.txt and add
dtoverlay=dwc2 - edit /boot/cmdline.txt and add
modules-load=dwc2,g_serial - run
sudo systemctl enable [email protected]
If you don’t have the cabling to hook up a keyboard, mouse, and monitor, you can still enable the serial gadget if you have a way of mounting the linux file system on another PC.
I’m not a super huge fan of this method, as I like keeping the MicroSD card “air-gapped” as soon as possible after writing the disk image to the card. If you have no alternative:
- mount the linux file system (and the boot file system) on another PC
- edit config.txt in the boot filesystem and add
dtoverlay=dwc2 - edit cmdline.txt in the boot filesystem and add
modules-load=dwc2,g_serial - in the ext4 file system, rename
/etc/systemd/system/getty.target.wants/[email protected]to[email protected]– I say “rename” so that the symlink and attributes remain the same. - Since you have the file system mounted, you can copy all of the vendored packages to /home/pi and skip some of the steps later where we transfer the data over the serial link.
- upon getting a command prompt for the first time, run the command
sudo systemctl enable [email protected]as to recreate the tty on the hardware serial port.
To test the serial gadget, first shutdown the Raspberry Pi (
sudo shutdown -h now) and remove all cables. Connect the Pi Zero to your PC using a MicroUSB cable in the USB data port (not the power port). After some time to boot, you should se a serial device appear. Use your favorite serial terminal app and after a few more seconds of booting, press enter a few times. You should get a login prompt. Login to your Pi Zero.One last thing I did– I didn’t want any of the other usb serial gadgets to be used accidentally (or maliciously) so I went to
/lib/modules/4.9.35+/kernel/drivers/usb/gadget/legacyand deleted all of the othe gadgets exceptg_cdc.ko,g_hid.ko,g_multi.ko, andg_serial.ko - edit /boot/config.txt and add
- Next we need to establish a way to transfer files to the Pi Zero using the serial link.
My method is to use a the tried and true Z-Modem protocol. Since I’m on a mac, I used homebrew to install the minicom and lrzsz pacakges:
brew install minicom

brew install lrzsz
Minicom is a bit of bear to use, but in short, run it withminicom -sand configure it to point at the serial port/dev/tty.usbmodemXXXXthat is the Pi Zero.If you’re on a PC, you can probably find some terminal app that supports Z-Modem.
Now we have one other issue, while your mac now has a way of sending a file via Z-modem, we still need a way of receiving that file on the Pi Zero. Normally it easy to install the lrzsz package, but again, we’re isolated from the interenet.
You’ll need the
lrzsz_0.12.21-7_armhf.debfile first:`http://mirrordirector.raspbian.org/raspbian/pool/main/l/lrzsz/lrzsz_0.12.21-7_armhf.deb
You’ll want to verify the SHA-256 checksum. Search the Pacakges file:
- Visit http://mirrordirector.raspbian.org/raspbian/dists/jessie/main/binary-armhf/Packages
- Search for lrzsz_0.12.21-7_armhf.deb
- Find it’s SHA256 hash
- Verify that it matches the file you downloaded.
How are we going to get this file over to the Pi? In a very painful way. We’re going to actually encode the file as base64, and then COPY AND PASTE the base64 representation into the terminal session!

- If you’re on a PC, you’ll need to find a way to encode the file as base64. On my mac, I encode the file as follows:
openssl base64 -in lrzsz_0.12.21-7_armhf.deb > lrzsz_0.12.21-7_armhf.deb.b64- In your terminal app, you should have a bash prompt on your Pi Zero. Type the following command to capture all subesquent input to a file:
cat > lrzsz_0.12.21-7_armhf.deb.b64- Open ‘lrzsz_0.12.21-7_armhf.deb.b64’ on your desktop and copy the contents to the clipboard
- In the terminal window, paste the contents. You’ll see a long scroll of base64 data.
- When the data stops scrolling, press Ctrl-D to end the file. You should find yourself back at the command prompt.
Next, we need to decode the b64 data back to a deb file. From the prompt on your Pi Zero:
base64 --decode lrzsz_0.12.21-7_armhf.deb.b64 > lrzsz_0.12.21-7_armhf.debI also did a quick md5 checksum to verify that the file made it properly.
Next, you install the package:
sudo dpkg -i lrzsz_0.12.21-7_armhf.debNow your Pi Zero knows how to receive a file via ZModem, so we don’t need to do this base64 dance anymore. You can delete the .deb and .b64 files since you won’t need them anymore.
- Next we need to “vendor” the dependencies and transfer them to the Pi Zero over the serial link. As I mentioned earlier, I used a development machine to install the Electrum dependencies and cups and I made a list of all of the dependencies that were required. I came up with a list of 75 debian packages and python packages that need to be installed on a full Raspian distribution. The list may differ depending on your distribution. My list is for
2017-01-11-raspbian-jessie.imgManually downloading each file, verifying the checksum, and uploading the package to the PiZero would be very tedius. I wrote a python script “vendorize.py” to automate the process:
With a text file list of debian and python packages, this script:
- Searches two debian pacakge repositories for the SHA-256 hash, or PyPi for the file’s hash.
- Downloads the file
- Verifies the hash
- Creates an “instal.sh” shell script which will install all the packages
- Bundles it up as a single tar.gz file for transfer to the Pi Zero.
You can find the list of dependencies I used, as well as the script on GitHub. Note that dependencies change often, so you might need to tweak your list.
Also, this python script isn’t really a general purpose vendoring tool. It worked for my single case and signle list of dependencies. I’ve only used it on Mac OS, so I can’t speak to how well it would work on Windows. Your mileage my vary.
python vendorize.py -l cups_and_electrum_dependencies.txt -i -o dependenceis.tar.gzAfter you have your .tar.gz of dependencies from the vendoring script, transfer it to the Pi Zero with Z-Modem over the serial link. Since we installed z-modem in step 4, you can execute the command “rz” on the Pi Zero and it will begin waiting for a Z-Modem transfer.
Depending on your terminal app, you may have to start your transfer in different ways. I’m using minicom (even though it has an inscrutable user interface). In Minicom, Meta-Z (Esc-Z on the Mac) the
Sto send a file. Navigate the inscrutable file selection user interface, and send your file:
- Extract your tar/gz package of dependencies on the PiZero and run the install script with sudo. If you’re paranoid, read over the install.sh file first to make sure it isn’t doing anyhting unexpected.
tar xvfz dependencies.tar.tz
cd dependencies
sudo install.sh
After a few minutes, you should have all the dependencies installed. Here is an example installing just the dependencies necessary for Electrum to run on a jessie-light install (command line only):
- One note on randomness. Key generation relies on entropy, the ability for your Pi Zero to generate random numbers. One of the dependencies I have in my list in rng-tools, which supports the hardware entropy source on the Pi Zero.[3] The full version of Raspian seems to have the divers installed by default.
You can test the randmoness of /dev/random in a few ways. The easiest is:
cat /proc/sys/kernel/random/entropy_availIf you get a number below 100, then you’re not using the hardware random number generator. You need to install the kernel module to get /dev/hwgen running, and rng-tools to make use of the hardware random number generator for /dev/random. Setup the kernel module:
- add
bcm2835_rngto/etc/modules - start the hwrng:
sudo modprobe bcm2835-rng
If you run that same entropy test, you should get a number ~2000 or so.
Another test of the rng-tools package is to run the following command[4]:
sudo kill -USR1 `cat /var/run/rngd.pid` ; sudo grep rngd /var/log/daemon.logYou’ll get a full breakdown of the randomness of the random number generator:
rngd 2-unofficial-mt.14 starting up... entropy feed to the kernel ready stats: bits received from HRNG source: 60064 stats: bits sent to kernel pool: 6144 stats: entropy added to kernel pool: 6144 stats: FIPS 140-2 successes: 3 stats: FIPS 140-2 failures: 0 stats: FIPS 140-2(2001-10-10) Monobit: 0 stats: FIPS 140-2(2001-10-10) Poker: 0 stats: FIPS 140-2(2001-10-10) Runs: 0 stats: FIPS 140-2(2001-10-10) Long run: 0 stats: FIPS 140-2(2001-10-10) Continuous run: 0 stats: HRNG source speed: (min=648.276; avg=661.307; max=669.039)Kibits/s stats: FIPS tests speed: (min=8.863; avg=8.874; max=8.888)Mibits/s stats: Lowest ready-buffers level: 2 stats: Entropy starvations: 0 stats: Time spent starving for entropy: (min=0; avg=0.000; max=0)us - add
- Next its time to transfer the remaining pacakges of interest:
- Electrum linux sources – https://electrum.org/#download
- (Optional) arm6 linux build for Etherium – https://geth.ethereum.org/downloads/
- (Optional) MyEtherWallet – https://github.com/kvhnuke/etherwallet/releases
Again, download the files and verify the checksums of gpg signatures of the files (unfortunately MyEtherWallet doesn’t provide any, so you just kind of have to trust. I only use it for paper wallets, not key generation)
Use your Z-modem skills to transfer the packages to your Pi Zero over the serial link.
Install the packages (I put geth in /usr/local/bin and MyEtherWallet in a folder in the home directory)
Generate your keys
For key generation, I like to use a monitor, keyboard, mouse. There is no reason you couldn’t do it from the command line. Since I want paper wallets, and need to use a browser, I need to boot into the X11 environment.
A bit of one time setup once you’re in the GUI: Configure cups. Hook up your printer and I follow this tutorial Make sure you can print from the chromium browser as you’ll need to later.
Next, you can generate your keys
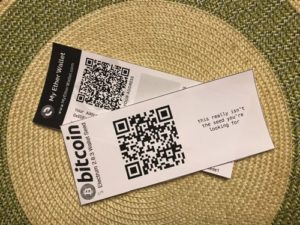
- Run Electrum and setup a new wallet. It will display a seed phrase. I wanted to have this seed phrase in paper form, so I wrote a little python script to generate a paper-wallet style backup. You can find the script in the GitHub repository
seedwallet.py -eEnter your seed phrase and it will open chromium-browser and display a printable representation of the seed phrase. Print it.
- Electrum will require you to re-enter the seed phrase. Enter it off your printed wallet just to verify that it printed correctly.
- Store the paper seed phrase securely. I consider this piece of paper my “wallet” not the keys on the Pi Zero — Not sure how much to trust the Pi Zero for long term storage.
- Use geth to create your electrum wallet.
geth account newThis will create a UTC/json wallet. Again, I wanted a paper wallet, so in chromium, I opened the copy of MyEtherWallet stored locally. One note, MyEtherWallet is VERY SLOW on my Pi Zero. (It took 4-10 minutes for the wallet to decrypt) Maybe its my MicroSD card, or maybe its just too many javascript crypto operations. Regardless, I ran chromium-broser from the command like with the
--disable-hang-monitoroption. It took minutes for some operations to complete, but I wasn’t in any hurry.You can open your UTC wallet from
~/.ethereumand print a paper wallet. Again, I consider this my “real wallet” and the digitial copy on the Pi Zero is just a convenience should I need to spend.MyEtherWallet supports signing offline transactions, should I need that capability in the future.
- Clean-up: I trashed the browser history (and the bash history for good measure
history -c) - Shut-down: One thing to note, you really do need to shutdown the Raspberry Pi when you’re done.
It is not a good practice to just yank the power, and can result in data loss. Data loss when it comes to wallet crypto keys is not a good thing. (You printed your paper wallets, right?)
Even still a simple shutdown command should be all you need.
sudo shutdown -h now - One more boot using the serial link to copy off the public portion of the keys: Using the serial connection and command line, I copied the public portion of each wallet using the clipboard, and loaded it into my “Hot wallet” on my desktop.
electrum getmpkwill give you your master public key, and can be used to set up a “watch only” wallet on your internet-connected desktopgeth account listto print your geth accounts
Again, a safe shutdown when complete.
Next steps
- I haven’t actually tried the hot wallet/cold wallet transaction signing process yet, so eventually I’d like to try that, but I don’t want to burn the transaction fees right now.
- I haven’t purchased any Etherium, so there’s more playing to do there.
Thanks
Thanks for reading. This is quite the disseration on something that would normally be very easy and straightforward if you were willing to connect your Pi Zero to the internet.
If this helped you, or you enjoyed this and would like to say thanks, a few mBTC or some Ether will help convince me to do more things like this in the future:

Bitcoin: 1PqvzEtDcboQYF2yhMvcdzK3J6uj7SMtQQ
Etherium: 0x568eBDFB7685230021942C33620263771014573B
If you have any feedback or suggestions, please send them to me. You can find me on Twitter at @AllAboutJake
Footnotes
[1] https://www.goinggo.net/2013/10/manage-dependencies-with-godep.html
[2] https://www.raspberrypi.org/forums/viewtopic.php?f=63&t=187936
[3] http://fios.sector16.net/hardware-rng-on-raspberry-pi/
[4] https://raspberrypi.stackexchange.com/questions/61888/how-to-know-if-dev-hwrng-is-working