UART0, otherwise known as the Mightyboard’s primary serial port, is connected to the USB hardware and used for communicating with Replicator G. Both RevE and RevG Mightyboards have an unpopulated header that contains for the 2nd serial port, UART1. Normally unused on modern hardware, this second serial port was originally used for the RS485 chain for slave tools.
I wanted to use this UART1 for something useful, so I added some code to Sailfish that allows you to swap the primary UART0 traffic to UART1. This allows you to connect a serial device to UART1, such as a bluetooth serial module, or a network-to-TTL-serial adapter. Bluetooth serial modules should work pretty easily, but with a little coaxing, you can even get ReplicatorG to connect over the network.
DISCLAIMER
- You should understand what you are doing. This information and/or software is not intended as turn-key, reliable solution. You should engineer your own solution, which may wind up being better, safer, and more reliable than mine.
- This is not a hardened and secure network appliance. Do not connect this directly to the exposed internet. It is intended to be behind a secure firewall (and NAT) such that it will only accept commands from the local network. Imagine how much fun a hacker could have instructing your 3D printer to continually print Stanford bunnies. Well it could be much worse then that– commands can crash your machine (both in the software sense, as well as in the “smash your moving parts against the side of the machine repeatedly sense), overheat your extruders, cause your build plate to catch fire, and do damage to surrounding people/property/buildings/etc. You have been warned.
- Never Print Unattended be ready to stop the machine if something goes wrong. Keep in mind, these heaters are operating at high temperatures, and if something catches on fire, it could cause damage to the machine, other property, and/or hurt yourself or others.
- Proceed at your own risk. You’ve been warned. If you break your bot, burn your house down, or injure yourself or others, I take no responsibility.
This information and/or software is provided by the author “as is” and any express or implied warranties, including, but not limited to, the implied warranties of merchantability and fitness for a particular purpose are disclaimed. In no event shall the author be liable for any direct, indirect, incidental, special, exemplary, or consequential damages (including, but not limited to, procurement of substitute goods or services; loss of use, data, or profits; or business interruption) however caused and on any theory of liability, whether in contract, strict liability, or tort (including negligence or otherwise) arising in any way out of the use of this information and/or software, even if advised of the possibility of such damage.
BACKGROUND
The Atmega 1280/2560 has several onboard Universal Asynchronous Receiver/Transmitters (UARTs). On a Mightyboard (both _one and _two), the first UART, UART0, is connected to the 8u2 USB subsystem for connecting to a PC. This is also the UART used by the bootloader to load new firmware. UART1, the second UART is used on older bots for communicating via RS485 to slave tool devices. This RS485 chain is not used on Mighyboards. It is exposed, however, as an unpopulated header on the RevE mightyboards used in Replicator 1’s and RevG boards used on Rep2’s and 2X’s. (It is also likely also exposed as an unpopulated header on RevH boards, but I have not seen one in person, or a picture of the backside of the board.)
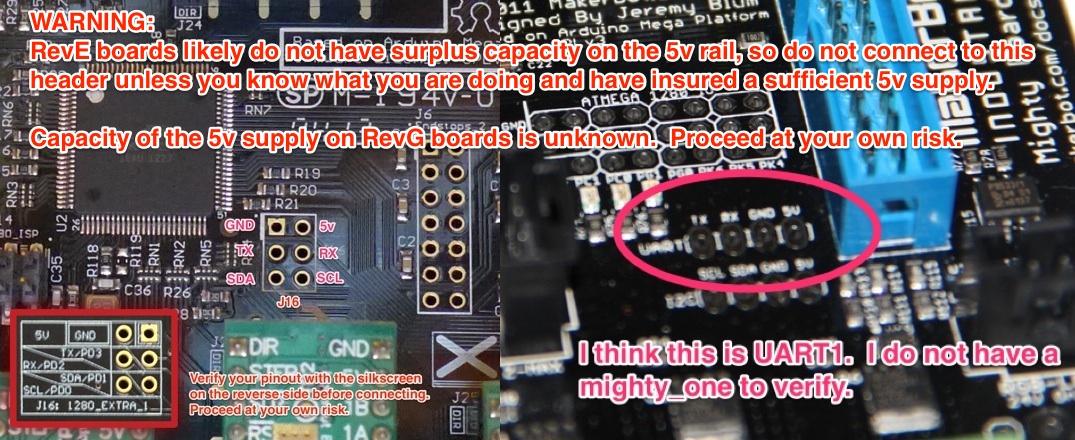
WARNING:
RevE boards likely do not have surplus capacity on the 5v rail, so do not connect to this
header unless you know what you are doing and have insured a sufficient 5v supply.
Capacity of the 5v supply on RevG/H boards is unknown. Proceed at your own risk.
CUSTOMIZATIONS TO SAILFISH
Next, some customizations were necessary to get the firmware to use UART1 instead of UART0. This was done with a friendly toggle in the Settings menu. Currently, this setting is not saved to the EEPROM, so on restart, it will revert to UART0. Also, since the bootloader still uses UART0, updating the firmware over USB and ReplicatorG is unchanged.

I have submitted the change to the Sailfish team and it is currently part of the 7.7 beta. It is not, however, compiled in to the binaries provided by the Sailfish team. If you wish to use this feature, you will have to compile it in yourself.
HARDWARE
Next, I needed something to connect to my new UART1 header. I chose a USR-TCP232-T module. It is available on eBay for under $20. It supports 5v supply and 5v logic signals. It was a simple matter of configuring and connecting up to the header.
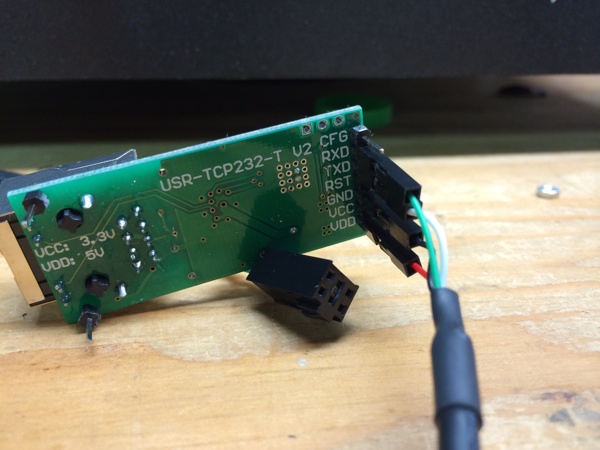
There are a few tricks with this module. First, it does not support DHCP. The IP address needs to be configured over the serial interface prior to connecting use. You need a small jumper on the CFG pin to ground, and then a TTL-USB-Serial adapter to connect the module to a Windows PC (or a trusty VM) as the software is PC-only. Once successfully programmed by the configuration application, you can remove the jumper to CFG and leave it floating.
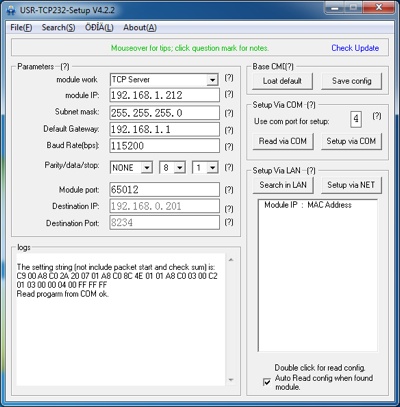
Once configured the device will connect to your network with the given IP address and network settings. It “TCP Server” mode, the device will listen on the given port for a connection. Once connected, it will essentially act as a virtual serial port.
Other hardware should be easily connected to this port, such as a commonly available bluetooth serial module. So long as it transparently acts like a serial port, and supports 5v for power and 5v tolerant logic pins, I would imagine that it could be made to work. I currently am waiting on a Bluetooth Low Energy module to try as well.
So far this module seems to work well for simple monitoring and control, but I do see an occasional bad packet response. I don’t recommend using this setup for printing over ethernet.
NOTE I do not know how much surplus capacity the 5v voltage regulator has on the Mightyboard. I know RevE boards are already operating near capacity, and many users do an upgrade of this component before it fails. I am not sure about the RevG board. This ethernet module needs 150mA and seems to be okay, but if you draw too much power from your Mightyboard on this header, you may do irreparable damage to your Mightyboard. Proceed at your own risk.
DESKTOP SUPPORT
On windows, there are available “virtual COM port” drivers that will act as a COM port but direct the traffic to a TCP connection. One of these should work fine for PC users. On a Mac (and I’m guessing linux) you can use “socat” to create a virtual serial port device:
sudo socat -d -d -d PTY,link=/dev/tty.netmodem0,raw,mode=666,echo=0 TCP:192.168.1.212:65102
This will create a /dev/tty.netmodem0 device, and send the traffic to the given TCP IP and port. Unfortunately, ReplicatorG will not pick this virtual port up as a serial port (on a Mac at least, I’m not sure about linux). In there are a few different ways to get ReplicatorG to see the given device.
- You can add the parameter “-Dgnu.io.rxtx.SerialPorts=/dev/tty.netmodem0” to the launch command that launches ReplicatorG. On MacOS X, you edit the Info.plist file inside the ReplicatorG.app package. This tells rxtx to use a specific serial port or ports. It will only show the ports given in this parameter, and hence it will not show any other “real” ports. Thus, you probably only want to do this temporarily while using a virtual COM port, since real serial ports will not be listed or available.
- I have made a change to ReplicatorG that allows you to put a new-line delimited list of port names in the text file ~/.replicatorg/ports These will be added to the serial ports list in ReplicatorG. This change has recently been accepted by the Sailfish team and will likely show up in future versions of ReplicatorG as built by the Sailfish team. I am not sure if the latest 40r26 build from the Sailfish team contains the feature.